
In today’s fast-paced digital world, keyboards have become an integral part of our daily lives. Whether you use it for work, gaming, or casual browsing, a clean keyboard ensures smooth functionality and a pleasant user experience. However, keyboards tend to accumulate dust, crumbs, and other debris over time, leading to decreased performance and unhygienic usage. One of the most effective ways to maintain your keyboard’s cleanliness is by using compressed air. In this comprehensive guide, we will delve into the art of cleaning a keyboard with compressed air, ensuring your device’s longevity and optimal performance.
How to Clean a Keyboard with Compressed Air: Enhance Your Device’s Lifespan
Why Cleaning Your Keyboard Matters
Before we delve into the cleaning process, let’s understand why keeping your keyboard clean is crucial. Keyboards are breeding grounds for germs and bacteria due to frequent contact with our hands. Regular cleaning not only promotes hygiene but also enhances the lifespan of your keyboard. Dust and debris accumulation can cause keys to stick, affecting your typing speed and accuracy. By cleaning your keyboard regularly, you can prevent such issues and enjoy a seamless typing experience.
Gathering Your Tools
To clean your keyboard effectively, you’ll need a few essential tools:
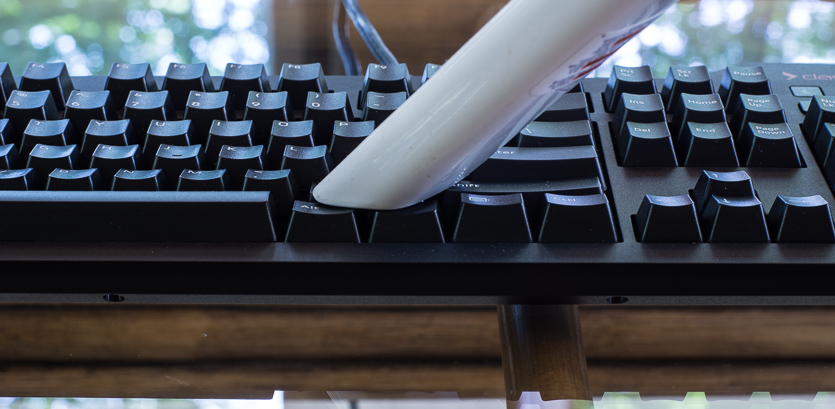
Compressed Air Canister
Invest in a high-quality compressed air canister with a thin nozzle attachment. The pressure from the canister will dislodge and remove the trapped debris between the keys.
Microfiber Cloth
A soft microfiber cloth is ideal for wiping the surface of the keyboard. It effectively removes smudges, fingerprints, and light dust.
Isopropyl Alcohol
Isopropyl alcohol is excellent for disinfecting your keyboard. Dampen a cloth or cotton swab with alcohol to sanitize the keys and kill germs.
Step-by-Step Cleaning Process
Now, let’s proceed with the step-by-step process to clean your keyboard using compressed air:
Turn Off Your Computer
Before you begin, shut down your computer or disconnect the keyboard. This ensures safety and prevents accidental keystrokes during the cleaning process.
Hold the Keyboard Upside Down
Hold your keyboard upside down and gently shake it to remove loose debris. This step helps dislodge larger particles that are easy to remove.
Use Compressed Air
With the keyboard still upside down, use the compressed air canister to blow air between the keys. Start from one end and move systematically across the entire keyboard. The compressed air will force out hidden dust and debris, leaving your keyboard clean and functional.
Clean the Surface
Use a microfiber cloth to wipe the surface of the keyboard, including the keys and the spaces between them. For stubborn stains or sticky residues, dampen the cloth with a small amount of isopropyl alcohol and gently clean the affected areas.
Let It Dry
Allow your keyboard to air dry for a few minutes before reconnecting it to your computer. Ensure that it is completely dry to avoid any electrical issues.
Conclusion
Cleaning your keyboard with compressed air is a simple yet highly effective way to maintain its performance and hygiene. By following the steps outlined in this guide, you can enjoy a clean and responsive keyboard for years to come. Remember, regular cleaning not only enhances your typing experience but also prolongs the lifespan of your beloved device.
Frequently Asked Questions
Can I clean my Keyboard with any type of Compressed Air?
It’s recommended to use compressed air specifically designed for cleaning electronics. Regular compressed air might contain moisture or oils that can damage your keyboard. Look for a canister labeled as “electronics duster” or “computer keyboard cleaner” for safe and effective cleaning.
How often should I clean my Keyboard with Compressed Air?
The frequency of cleaning depends on your usage and the environment. If you use your keyboard extensively in a dusty or high-traffic area, it’s advisable to clean it every 1-2 months. For light users, cleaning every 3–4 months should be sufficient to maintain optimal performance.
Is it necessary to disconnect my Keyboard before cleaning with Compressed Air?
Yes, it’s essential to turn off your computer or disconnect the keyboard before cleaning with compressed air. This ensures safety and prevents accidental keystrokes. Also, holding the keyboard upside down while spraying the air helps prevent debris from falling back into the keys.
Can I use a Vacuum Cleaner instead of compressed air to clean my Keyboard?
Using a vacuum cleaner is not recommended for cleaning keyboards. Vacuums can create static electricity, potentially damaging sensitive electronic components. Compressed air is designed to safely remove dust and debris without causing harm to your keyboard.
Can I clean a Laptop Keyboard with Compressed Air?
Yes, you can clean a laptop keyboard with compressed air, but it requires a bit more caution. Hold the laptop upside down and spray the compressed air in short bursts to avoid damaging the internal components. Alternatively, you can use a small handheld vacuum cleaner with a brush attachment to gently remove debris from the keys. Always refer to your laptop’s manual for specific cleaning instructions.