
When it comes to working at a computer, a keyboard is one of the most important tools. Unfortunately, accidents happen, and spills on a keyboard are a common occurrence. Whether it’s a cup of coffee, a glass of water, or any other liquid, a spill can cause serious damage to a keyboard if not handled correctly. Knowing how to clean a keyboard after a spill is essential for anyone who spends a lot of time working at a computer.
The good news is that cleaning a keyboard after a spill is not as difficult as it may seem. With the right tools and techniques, anyone can clean a keyboard and get it back to working condition in no time.
In this article, we will cover the steps you need to take to clean a keyboard after a spill. We will also discuss the tools you will need and provide tips to help prevent spills from happening in the first place. So, if you’ve spilled a drink on your keyboard or just want to be prepared for the worst-case scenario, keep reading to learn how to clean a keyboard after a spill.
Contents
- 0.1 How to Clean a Keyboard After a Spill: Simple Steps to Save Your Device
- 0.2 Immediate Actions After a Spill
- 0.3 Cleaning the Keyboard
- 0.4 Drying the Keyboard
- 0.5 Reassembly and Testing
- 1 How to Clean Laptop Keyboard After Spilling Your Coffee
- 1.1 Supplies You’ll Need to Clean Your Spilled-On Laptop Keyboard
- 1.2 First Steps After Spilling on Your Laptop
- 1.3 How To Disassemble a Laptop Keyboard
- 1.4 Cleaning Under Laptop Keyboard Keys
- 1.5 Drying Out Your Laptop Keyboard
- 1.6 Reassembling Your Laptop Keyboard
- 1.7 Summary – Key Steps to Cleaning a Spilled Laptop Keyboard
- 1.8 Frequently Asked Questions
How to Clean a Keyboard After a Spill: Simple Steps to Save Your Device

Immediate Actions After a Spill
When a spill occurs on a keyboard, immediate action is crucial to minimize damage. Here are the steps to take:
Turn Off the Power
The first step is to turn off the power to the keyboard. If the keyboard is connected to a desktop computer, shut down the computer. If it is a laptop, turn it off and unplug it from the power source. This will prevent short circuits and further damage to the keyboard.
Unplug Peripherals
Next, unplug any peripherals such as a mouse, USB drive, or any other device connected to the keyboard. This will prevent any of these devices from getting damaged and also make it easier to clean the keyboard.
Blot the Excess Liquid
The next step is to blot the excess liquid from the keyboard. Use a clean, dry cloth or paper towel to gently blot the liquid. Do not wipe or rub the keyboard as this can push the liquid further into the keyboard and cause more damage. Be sure to remove any visible debris or particles from the keyboard.
It is important to note that the above steps are only immediate actions to prevent further damage. To fully clean the keyboard, additional steps are required, which will be covered in the following sections.
Cleaning the Keyboard
Cleaning a keyboard after a spill is essential to prevent damage to the components and ensure that it functions properly. Here are the steps to follow:
Prepare Cleaning Supplies
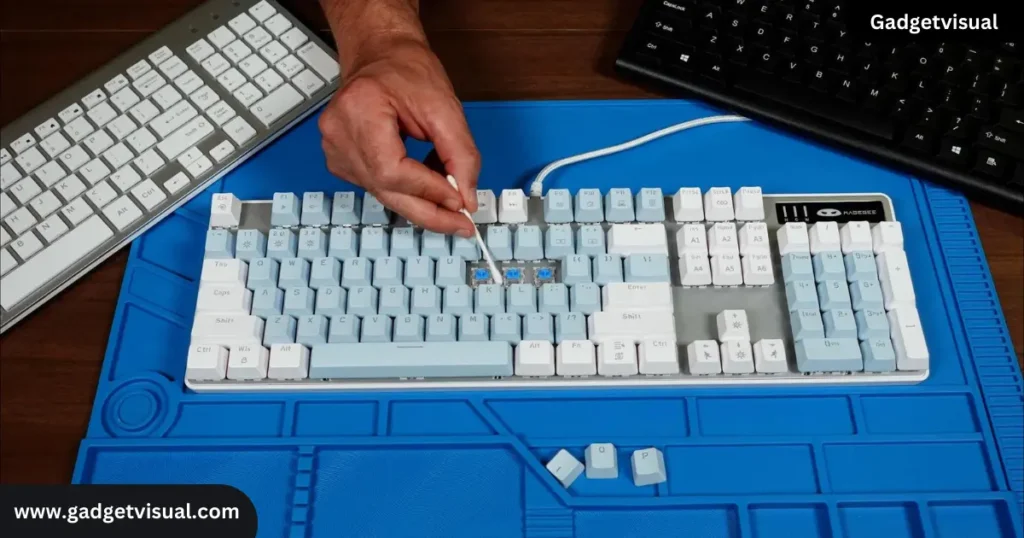
Before starting, gather the necessary cleaning supplies, including a soft cloth, a bowl of warm water, mild dish soap, a keycap puller, and a can of compressed air. Ensure that the keyboard is unplugged and turned off.
Remove Keycaps
To clean the keyboard thoroughly, remove the keycaps carefully using a keycap puller. Place the keycaps in a bowl of warm soapy water and let them soak for a few minutes. Gently scrub each keycap with a soft brush or cloth to remove any residue or debris. Rinse the keycaps with clean water and let them dry completely before replacing them.
Clean Surface and Keys
Next, use a soft cloth dampened with warm soapy water to clean the surface and keys of the keyboard. Be careful not to use too much water, as it can damage the keyboard’s internal components. Use a can of compressed air to blow out any debris or dust from the keyboard’s crevices and corners.
In conclusion, following these steps will help to clean a keyboard after a spill and ensure that it functions properly.
Drying the Keyboard
After cleaning the keyboard, the next step is to dry it thoroughly. Drying the keyboard is crucial because any remaining moisture can cause further damage to the internal components. There are two methods to dry the keyboard: air drying and using absorbents.
Air Drying
Air drying is the most common method to dry a keyboard. The first step is to shake the keyboard gently to remove any excess water. Then, place the keyboard upside down on a clean, dry towel. This position allows the water to drain out of the keyboard. After that, leave the keyboard to air dry for at least 24 hours. It is important to avoid using a hairdryer or any other heat source to dry the keyboard as it can damage the internal components.
Using Absorbents
Using absorbents is another method to dry a keyboard. The first step is to shake the keyboard gently to remove any excess water. Then, place the keyboard, key side down, on a clean, dry towel. Cover the keyboard with another towel and press down gently to absorb the moisture. Repeat this process with dry towels until no more moisture is absorbed. After that, leave the keyboard to air dry for at least 24 hours.
It is important to note that using rice or any other food item to absorb moisture is not recommended. Rice can leave behind dust and debris that can damage the internal components of the keyboard. Moreover, rice can also attract insects and pests, which can further damage the keyboard.
In conclusion, drying the keyboard is an essential step after cleaning it. Air drying and using absorbents are the two most effective methods to dry a keyboard. It is important to avoid using heat sources and food items to dry the keyboard as they can cause further damage.
Reassembly and Testing
Reattach Keycaps
Once the keyboard is completely dry, it’s time to reattach the keycaps. Start by identifying the keys and their corresponding locations on the keyboard. Refer to any notes or photographs taken during the disassembly process to ensure that each keycap is placed in the correct position.
To reattach the keycaps, simply align each keycap with its switch and press down gently until it clicks into place. Take care not to force the keycap, as this can damage the switch or the keycap itself.
Test Keyboard Functionality
Before using the keyboard, it’s important to test its functionality. Connect the keyboard to a computer and type a few test phrases to ensure that all the keys are functioning properly.
If any keys are not working, double-check that the keycaps are properly seated and aligned with their corresponding switches. If the issue persists, it may be necessary to replace the affected switch or seek professional repair services.
Overall, cleaning a keyboard after a spill can be a time-consuming process, but it’s important to take the necessary steps to prevent long-term damage to the device. By following the steps outlined in this guide, users can effectively clean and restore their keyboard to working order.
How to Clean Laptop Keyboard After Spilling Your Coffee
Have you ever spilled your morning coffee, water, or other drink right onto your laptop’s keyboard? It’s a cringe-worthy moment as you see the liquid seep down between the keys, with some of it likely ending up inside your precious device. A spill on your laptop’s keyboard can lead to sticky, non-functioning keys, corrosion, shorts, and possibly even permanent damage if left unchecked. Fortunately, if you take quick action, you can likely salvage your keyboard and get it working again by clean spill.

Supplies You’ll Need to Clean Your Spilled-On Laptop Keyboard
Before doing anything else, you’ll want to gather the proper cleaning supplies. Here’s what you need:
- Isopropyl alcohol
- Cotton swabs
- Small/medium Phillips head screwdriver
- Clean microfiber cloth
- Can of compressed air
- Paper towels
The isopropyl alcohol, cotton swabs, and screwdriver will help you access and clean the intricate areas of the keyboard. The microfiber cloth and compressed air will aid in drying. Paper towels can soak up any pooled liquid.
First Steps After Spilling on Your Laptop
Once you spill a liquid like coffee or water on your laptop, follow these immediate steps:
- Power off the laptop if it is still on. Hold down the power button for 5-10 seconds to force a shutdown.
- Unplug the laptop and remove any attached batteries to prevent electrical damage.
- Turn the laptop upside-down to allow the liquid to drain out openings rather than seeping deeper inside. Open the screen so the keyboard is angled down.
- Use a dry paper towel or cloth to soak up any liquid pooling on the keyboard. Avoid rubbing for now.
- If possible, lightly shake the laptop to fling off any droplets stuck under the keys.
- Let the laptop remain upside-down on a towel for at least 15-30 minutes before disassembling. This allows time for some liquid to drain out.
Avoid turning the laptop back on until you have cleaned under the keyboard keys. Residual liquid could short internal components when power is applied.
How To Disassemble a Laptop Keyboard
To truly clean out all sticky residue from a keyboard spill, you will likely need to remove the keycaps to access the underside. Here is how to disassemble a laptop keyboard:
- Refer to a repair/disassembly guide for your specific laptop model to understand the proper way to access the keyboard. Methods vary.
- Commonly, you’ll need to pry off the laptop’s top case/bezel to reveal the keyboard and other components. Apply careful force with a credit card tool.
- Use a Phillips head screwdriver to remove any screws still holding the keyboard in place from the underside.
- Gently lift the keyboard away from the laptop body to detach the ribbon cable from the motherboard.
- Flip over the keyboard to access the keycaps you need to remove.
Take photos with your phone during disassembly so you can properly reassemble later. Store any loose screws and components together.

Cleaning Under Laptop Keyboard Keys
Here are the steps to clean under laptop keyboard keys once disassembled:
- Remove keycaps – Use a small flathead screwdriver or your fingernails to pry keycaps up from the top and bottom switches they clip onto. Lift them out.
- Use isopropyl alcohol and cotton swabs to scrub away sticky residue or dried liquid clinging around and under the keys. Get into small nooks and crannies.
- If keys were very sticky, soak them in isopropyl alcohol to dissolve gunk. Blot dry with a microfiber cloth.
- Scrub the keyboard surface with alcohol and swabs to remove grime buildup.
- Spray compressed air under the keys and across the keyboard to help fully dry out any lingering moisture.
Thoroughly cleaning under the keys, around the switches, and on the surface is key to avoiding future stickiness or corrosion after your spill incident.
Drying Out Your Laptop Keyboard
Even after cleaning up all visible liquid from a spill on your laptop keyboard, moisture can still remain in crevices and under components. To fully dry out the keyboard, use these methods:
- Let the disassembled laptop sit for at least 24 hours in a warm, dry environment to allow natural evaporation of moisture. Position it upside-down.
- Lightly blow compressed air across hard-to-reach areas like under the keyboard ribbon cable and motherboard to speed evaporation.
- Place the keyboard in front of a fan blowing room-temperature air. Do not use high heat.
- Insert paper towels or cloth under parts of the keyboard to absorb hidden moisture wicked out. Replace them periodically.
- Once fully dry, reassemble the laptop. Do not power it on for 48 hours to allow hidden moisture to evaporate.
Rushing the drying process risks condensing or undetected liquid shorting electronic components when powered on. Take it slow.
Reassembling Your Laptop Keyboard
After cleaning and drying, you can reassemble your laptop keyboard to complete the repair:
- Check under keycaps and the keyboard for any remaining moisture or stickiness requiring more cleaning.
- Replace all keycaps by gently snapping them onto the top and bottom keyboard switches.
- Reconnect the keyboard ribbon cable to the pins on the motherboard if detached.
- Position the keyboard back into place over the components and screw holes. Insert and tighten any screws.
- Snap the laptop’s top case/bezel back on, starting from one side and pressing around all edges to secure.
- Re-insert any batteries and plug in AC power cord but don’t power on for 48 hours.
- After allowing more drying time, attempt to turn on the laptop and test the keyboard. Keys should move freely and type properly on screen.
Take slow, methodical steps when reassembling to avoid damaging any parts. If keyboard issues persist, more cleaning or a replacement may be needed.
read more
Unlock Your Dell Laptop Keyboard: Quick Fixes & Tricks!
The Ultimate Guide on How to Clean a Chromebook Keyboard
Summary – Key Steps to Cleaning a Spilled Laptop Keyboard
To recap, here are the key things to remember when cleaning up a spilled laptop keyboard:
- Immediately unplug power and remove batteries after a spill
- Turn the laptop upside-down to drain liquid out openings
- Disassemble the laptop to directly access and remove the keyboard
- Thoroughly clean under keycaps and the surface with isopropyl alcohol
- Use compressed air to dry out hidden moisture under the keyboard, cables, etc
- Allow at least 24-48 hours for the keyboard to fully dry before reassembling
- Slowly reassemble the laptop, taking care to reconnect cables properly
- Let it sit powered off for another 48 hours before testing the keyboard
Stay calm, take your time, and follow these keyboard spill cleaning basics. With some luck and proper technique, you can save that coffee-soaked laptop keyboard!
Frequently Asked Questions
(How to Clean a Keyboard After a Spill)
Q1. How do you fix a keyboard after spilling liquid on it?
To fix a keyboard after spilling liquid on it, start by unplugging it and removing any batteries. Then, flip it upside down and let it dry for at least 24 hours. Use a can of compressed air to remove any remaining liquid and debris. If the keys are still sticky, carefully remove and clean them with rubbing alcohol.
Q2. Is it OK to clean a keyboard with wet wipes?
Yes, it is generally okay to clean a keyboard with wet wipes, as long as they are not overly wet and you make sure to dry the keyboard thoroughly afterwards. However, it is important to use wipes that are specifically designed for electronic equipment to avoid damaging the keyboard.
Q3. How long does it take for a keyboard to dry out?
The time it takes for a keyboard to dry out can vary depending on the amount of liquid spilled and the type of keyboard. In general, it can take anywhere from 24 hours to several days for a keyboard to completely dry out. It’s important to allow sufficient time for the keyboard to dry before attempting to use it again.
Q4. Cleaning – Tips for getting latte or soda out of your keyboard?
To clean a keyboard that has been stained with latte or soda, start by unplugging the keyboard and turning it upside down to shake out any liquid. Then, use a cotton swab dipped in rubbing alcohol to gently clean the affected keys. Be sure to press the keys down to allow the alcohol to seep in and clean underneath. For stubborn stains, you can also use a small amount of mild dish soap mixed with water to gently clean the keys. After cleaning, allow the keyboard to dry completely before plugging it back in. It’s important to be gentle and patient during this process to avoid damaging the keyboard.